In this article I’m going to show you how to create a resilient Consul cluster, using Terraform and AWS. We can use this cluster for microservice discovery and management. No prior knowledge of the technologies or patterns is required!
The final code is at github.com/dwmkerr/terraform-consul-cluster. Note that it has evolved somewhat since the time of writing, see the Appendices at the end of the article for details.
Consul, Terraform & AWS
Consul is a technology which enables Service Discovery1, a pattern which allows services to locate each other via a central authority.
Terraform is a technology which allows us to script the provisioning of infrastructure and systems. This allows us to practice the Infrastructure as Code pattern. The rigour of code control (versioning, history, user access control, diffs, pull requests etc) can be applied to our systems.
And why AWS? We need to create many servers and build a network to see this system in action. We can simulate parts of this locally with tools such as Vagrant, but we can use the arguably most popular2 IaaS platfom for this job at essentially zero cost, and learn some valuable skills which are readily applicable to other projects at the same time.
A lot of what we will learn is not really AWS specific - and the Infrastructure as Code pattern which Terraform helps us apply allows us to apply these techniques easily with other providers.
The Goal
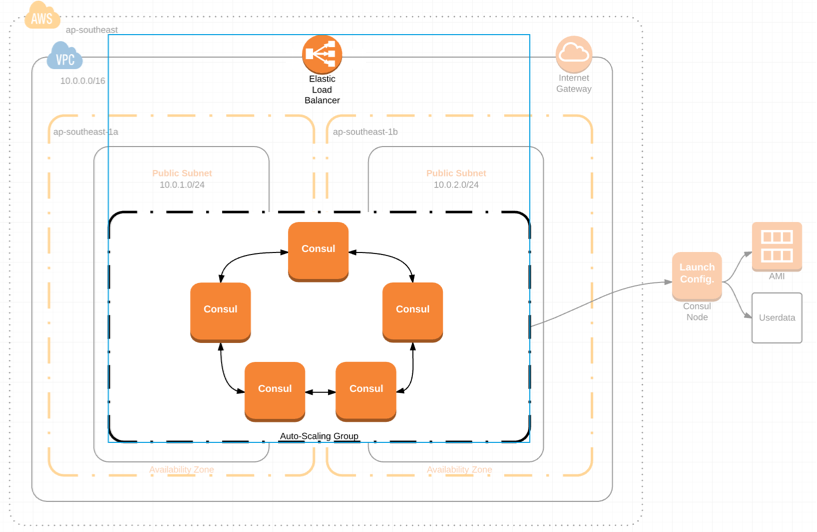
The goal is to create a system like this:

In a nutshell:
- We have a set of homogenous Consul nodes
- The nodes form a cluster and automatically elect a leader
- The nodes span more than one availability zone, meaning the system is redundant and can survive the failure of an entire availability zone (i.e. data centre)
- The Consul UI is available to view via a gateway
- We have two example microservices which register themselves on the cluster, so we can actually see some registered services in the console
As a quick caveat, in reality this setup would typically live in a private subnet, not directly accessible to the outside work except via public facing load balancers. This adds a bit more complexity to the Terraform setup but not much value to the walk-though. A network diagram of how it might look is below, I invite interested readers to try and move to this model as a great exercise to cement the concepts!
Step 1 - Creating our Network
The first logical step is to create the network itself. This means:
- The network (in AWS terminology, this is a VPC or Virtual Private Cloud)
- The ‘public’ subnet, which defines our IP ranges for hosts
- The internet gateway, which provides an entry/exit point for traffic from/to the internet
- The firewall rules, which define what traffic can come in and out of the network
All together, that’s this:

Our solution will be made more resilient by ensuring we host our Consul nodes across multiple availability zones3
Creating a VPC and building a subnet is fairly trivial if you have done some network setup before or spent much time working with AWS, if not, you may be a little lost already. There’s a good course on Udemy4 which will take you through the process of setting up a VPC which I recommend if you are interested in this, as it is quite hands on. It’ll also show you how to build a more ‘realistic’ network, which also contains a private subnet and NAT, but that’s beyond the scope of this write-up. Instead, I’ll take you through the big parts.
The Network
We’re using AWS, we need to create a VPC. A VPC is a Virtual Private Cloud. The key thing is that it is isolated. Things you create in this network will be able to talk to each other if you let them, but cannot communicate with the outside world, unless you specifically create the parts needed for them to do so.
A private network is probably something you regularly use if you work in a company5. Most companies have their own internal network - when you use a computer on that network it can talk to other company computers (such as the company mail server). When you are off that network, you might not be able to access your company email (unless it is publicly available, like gmail, or over a VPN [and by accessing a VPN, you are actually joining the network again, albeit remotely]).
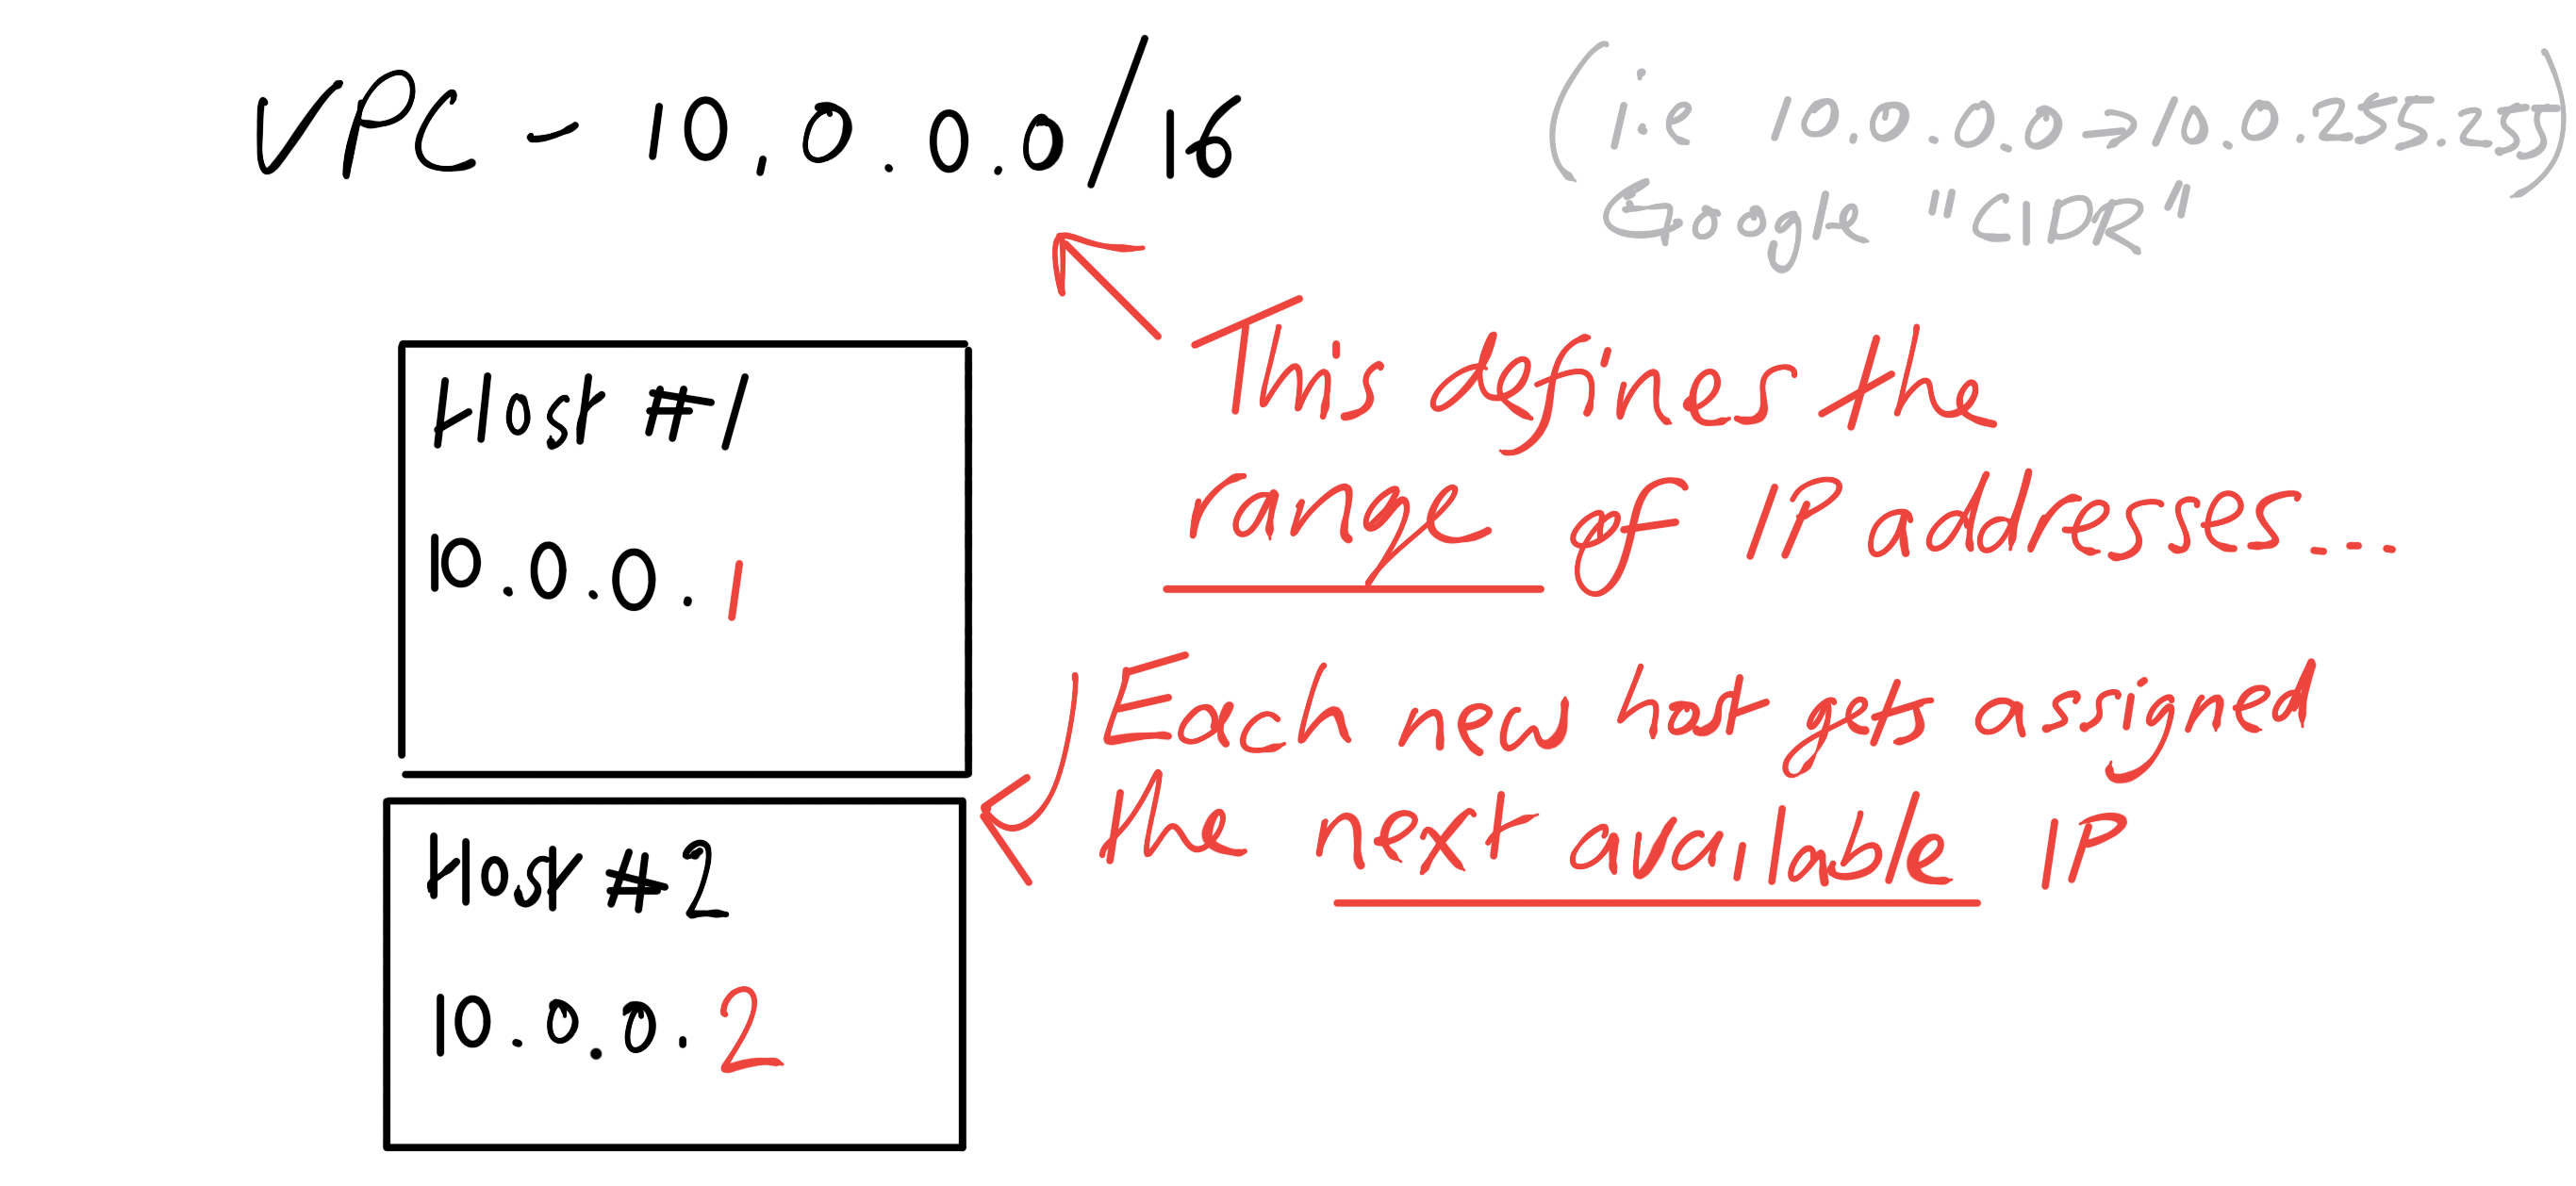
Perhaps the most immediately obvious part of a VPC is that you control the IP addresses. You specify the range of IP addresses which are available to give to machines on the network. When a machine joins, it is given an IP in that range. I’m not going to go into too much detail here, if you are interested let me know and I’ll write up an article on VPCs in detail!
Here’s how I’d suggest scripting AWS infrastructure with Terraform if you haven’t done this before.
- Use the AWS console to create what you want
- Search the Terraform documentation for the entity you want to create (e.g. VPC), script the component and apply the provisioning
- Compare the hand-made VPC to the script-made VPC, if the two are the same, you are done
- If the two are different, check the documentation and try again
Ensure you have an AWS account, and note your Secret Key and Access Key. We’ll need these to remotely control it. Here’s the terraform script to create a VPC:
//  Setup the core provider information.
provider "aws" {
  access_key  = "${var.access_key}"
  secret_key  = "${var.secret_key}"
  region      = "${var.region}"
}

//  Define the VPC.
resource "aws_vpc" "consul-cluster" {
  cidr_block = "10.0.0.0/16" // i.e. 10.0.0.0 to 10.0.255.255
  enable_dns_hostnames = true
  tags {
    Name = "Consul Cluster VPC"
    Project = "consul-cluster"
  }
}
This script uses Terraform Variables, such as var.access_key, which we keep in a variables.tf file. Terraform will use the default values defined in the file if they are present, or ask the user to supply them. Let’s build the network:
terraform apply
After supplying the values for the variables, Terraform will provision the network, using the AWS SDK internally.
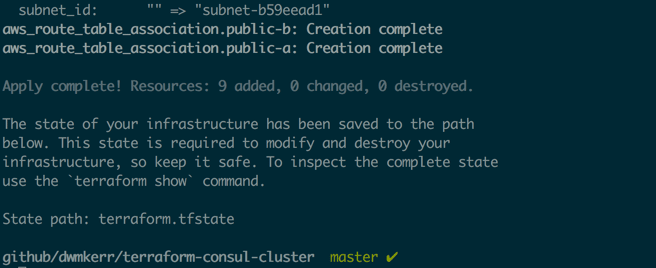
You’ll see lots of info about what it is creating, then a success message.
The Public Subnet
You don’t put hosts directly into a VPC, they need to go into a structure called a ‘subnet’, which is a part of a VPC. Subnets get their own subset of the VPC’s available IP addresses, which you specify.
Subnets are used to build zones in a network. Why would you need this? Typically it is to manage security. You might have a ‘public zone’ in which all hosts can be accessed from the internet, and a ‘private zone’ which is inaccessible directly (and therefore a better location for hosts with sensitive data). You might have an ‘operator’ zone, which only sysadmins can access, but they can use to get diagnostic information.
Here’s a common subnet layout for multi-tiered applications:
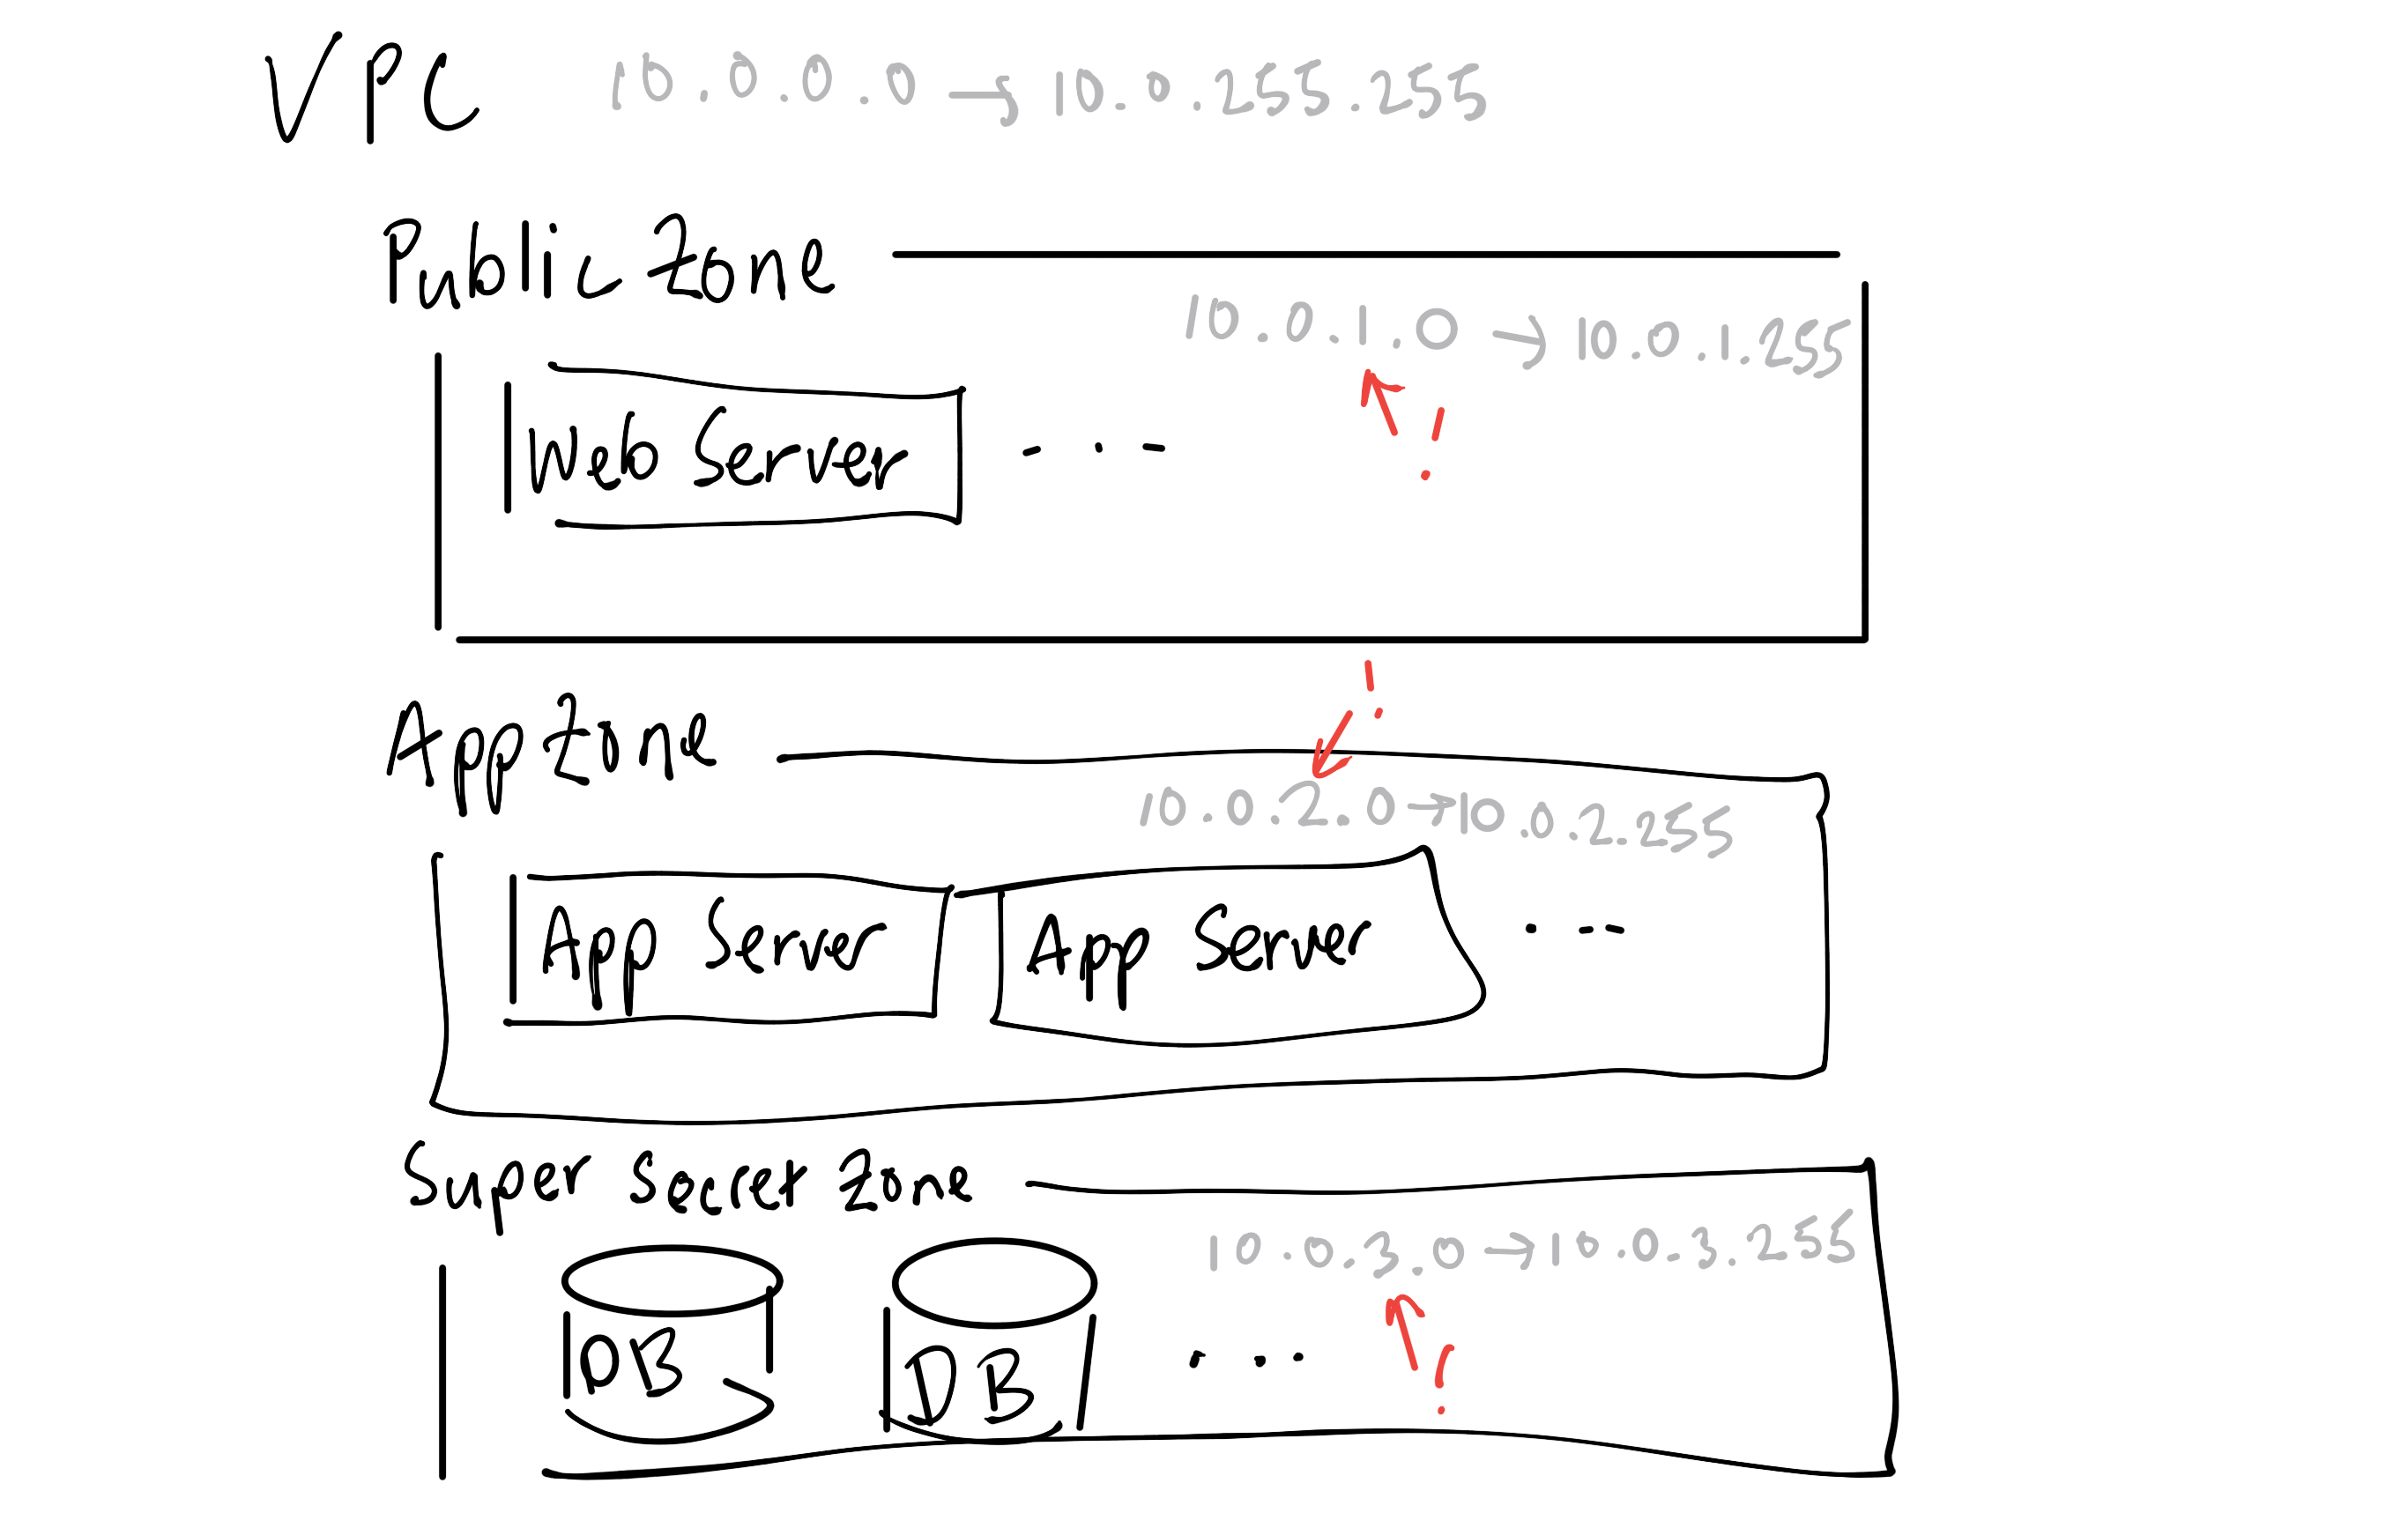
The defining characteristics of zones is that they are used to create boundaries to isolate hosts. These boundaries are normally secured by firewalls, traversed via gateways or NATs etc. We’re going to create two public subnets, one in each of the availability zones5:
//  Create a public subnet for each AZ.
resource "aws_subnet" "public-a" {
  vpc_id            = "${aws_vpc.consul-cluster.id}"
  cidr_block        = "10.0.1.0/24" // i.e. 10.0.1.0 to 10.0.1.255
  availability_zone = "ap-southeast-1a"
  map_public_ip_on_launch = true
}
resource "aws_subnet" "public-b" {
  vpc_id            = "${aws_vpc.consul-cluster.id}"
  cidr_block        = "10.0.2.0/24" // i.e. 10.0.2.0 to 10.0.1.255
  availability_zone = "ap-southeast-1b"
  map_public_ip_on_launch = true
}
With Terraform, resources can depend on each other. In this case, the subnets need to reference the ID of the VPC we want to place them in (so we use aws_vpc.consul-cluster.id).
The Internet Gateway, Route Tables and Security Groups
The final parts of the network you can see in the ./infrastructure/network.tf script. These are the Internet Gateway, Route Table and Security Group resources. Essentially they are for controlling access between hosts and the internet. AWS have a good guide if you are not familiar with these resources; they don’t add much to the article so I’ll leave you to explore on your own.
That’s it for the network, we now have the following structure:
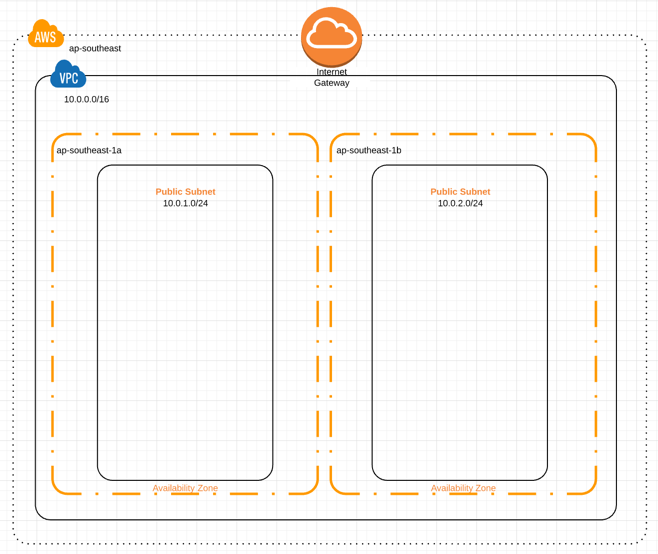
If you want to see the code as it stands now, check the Step 1 branch. Now we need to look at creating the hosts to install Consul on.
Step 2 - Creating the Consul Hosts
The Consul documentation recommends running in a cluster or 3 or 5 nodes6. We want to set up a system which is self-healing - if we lose a node, we want to create a new one.
Enter Auto-Scaling Groups. Auto-scaling groups allow us to define a template for an instance, and ask AWS to make sure there are always a certain number of these instances. If we lose an instance, a new one will be created to keep the group at the correct size7.
So we now need to create:
- A ‘Launch Configuration’ which determines what instances our Auto-scaling Group creates
- A ‘user data script’ which runs on newly created instances, which must install and start Consul
- An Auto-scaling group, configured to run five instances across the two public subnets
- A load balancer, configured to pass incoming requests for the Consul Admin console to the nodes
Or visually:
Let’s get to it.
The Launch Configuration & Auto-scaling Group
The Launch Configuration will define the characteristics of our instances and the auto-scaling group determines the size of our cluster:
//  Launch configuration for the consul cluster auto-scaling group.
resource "aws_launch_configuration" "consul-cluster-lc" {
    name_prefix = "consul-node-"
    image_id = "${lookup(var.ami_ecs_optimised, var.region)}"
    instance_type = "t2.micro"
    security_groups = ["${aws_security_group.consul-cluster-vpc.id}"]
    lifecycle {
        create_before_destroy = true
    }
}

//  Auto-scaling group for our cluster.
resource "aws_autoscaling_group" "consul-cluster-asg" {
    name = "consul-asg"
    launch_configuration = "${aws_launch_configuration.consul-cluster-lc.name}"
    min_size = 5
    max_size = 5
    vpc_zone_identifier = [
        "${aws_subnet.public-a.id}",
        "${aws_subnet.public-b.id}"
   ]
    lifecycle {
        create_before_destroy = true
    }
}
A few key things to note:
- I have omitted the
tagproperties in the scripts for brevity - The ‘image’ for the launch configuration is looked up based on the region we’ve specified - we’re a basic linux image8
- We are using micro instances, which are free-tier eligible
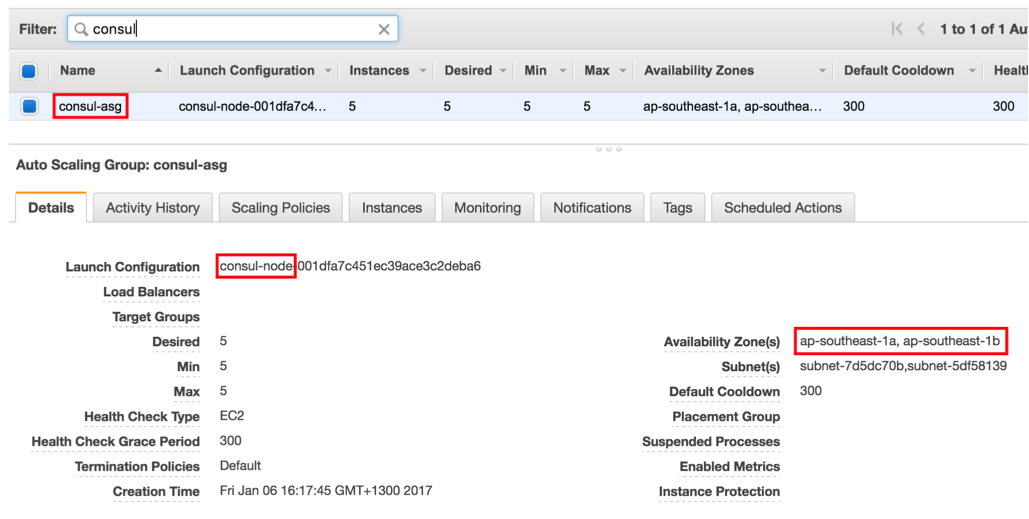
- The auto-scaling group spans both availability zones.
Once we run terraform apply, we’ll see our auto-scaling group, which references the new launch configuration and works over multiple availability zones:
We can also see the new instances:
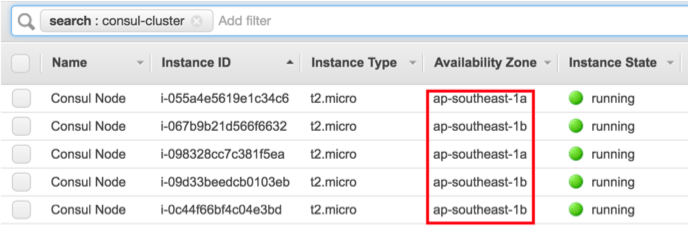
These instances don’t do much yet though, we’ve not installed Docker or Consul.
Installing Consul and Accessing the Admin Interface
To set up our instances we use a ‘userdata’ script’ A userdata runs once when an instance is created. We can create a script in our repository, and reference it in our Terraform files.
We add a new file called consul-node.sh to a files folder. This script installs Docker and runs Consul:
yum install -y docker
usermod -a -G docker ec2-user
service docker start

# Get my IP address.
IP=$(curl http://169.254.169.254/latest/meta-data/local-ipv4)
echo "Instance IP is: $IP"

# Start the Consul server.
docker run -d --net=host \
    --name=consul \
    consul agent -server -ui \
    -bind="$IP" \
    -client="0.0.0.0" \
    -bootstrap-expect="1"
Here’s a breakdown of what we’re doing:
- Install Docker. These scripts run as root, so we add the ec2-user to the Docker group, meaning when we log in later on via SSH, we can run Docker
- Get our IP address. AWS provide a magic address (169.254.169.254) which lets you query data about your instance, see Instance Metadata & User Metadata
- Run the Consul docker image in server mode, with the UI enabled, expecting only one instance
The actual scripts contains more! Getting userdata scripts right, testing and debugging them is tricky. See how I do it in detail in Appendix 1: Logging.
Now we need to tell Terraform to include this script as part of the instance metadata. Here’s how we do that:
resource "aws_launch_configuration" "consul-cluster-lc" {
    /// ...add the line below....
    user_data = "${file("files/consul-node.sh")}"
}
When Consul is running with the -ui option, it provides an admin UI. You can try it by running Consul locally with docker run -p8500:8500 consul and navigating to http://localhost:8500/ui.
We can install a load balancer in front of our auto-scaling group, to automatically forward incoming traffic to a host. Here’s the config:
resource "aws_elb" "consul-lb" {
    name = "consul-lb-a"
    security_groups = [
        "${aws_security_group.consul-cluster-vpc.id}",
        "${aws_security_group.web.id}"
    ]
    subnets = [
        "${aws_subnet.public-a.id}",
        "${aws_subnet.public-b.id}"
    ]
    listener {
        instance_port = 8500
        instance_protocol = "http"
        lb_port = 80
        lb_protocol = "http"
    }
    health_check {
        healthy_threshold = 2
        unhealthy_threshold = 2
        timeout = 3
        target = "HTTP:8500/ui/"
        interval = 30
    }
}
Blow-by-blow:
- Create a load balancer, with the same security groups as the rest of the VPC, but also a security group which allows web access
- Point to two subnets first subnet
- Forward HTTP 8500 traffic
- Configure a healthcheck9
The final change we make is to add an outputs.tf file, which lists all of the properties Terraform knows about which we want to save. All it includes is:
output "consul-dns" {
    value = "${aws_elb.consul-lb.dns_name}"
}
When we finally run terraform apply, we see the public DNS of our load balancer:
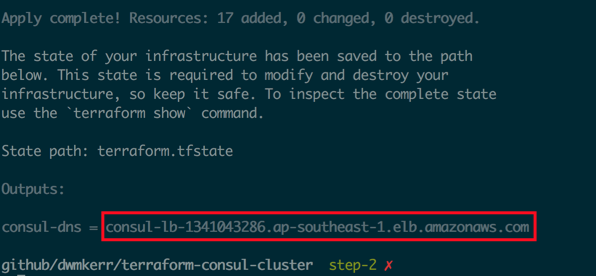
And running in a browser on port 8500 we see the Consul admin interface:
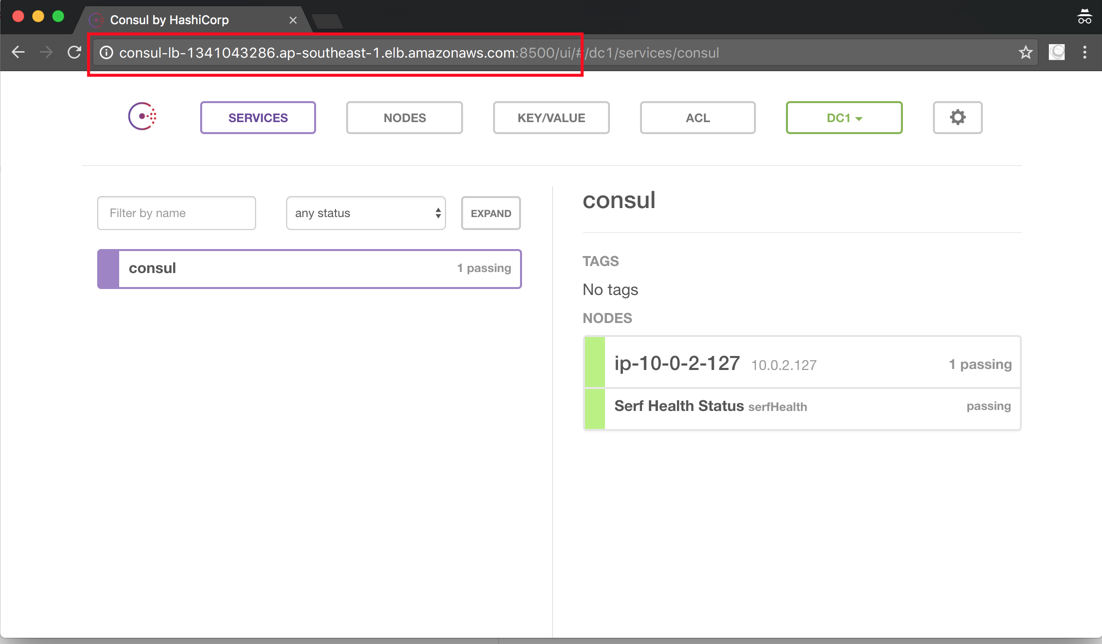
Every time we refresh we will likely see a different node. We’ve actually created five clusters each of one node - what we now need to do is connect them all together into a single cluster of five nodes.
If you want to see the code as it stands now, check the Step 2 branch.
Step 3 - Creating the Cluster
Creating the cluster is now not too much of a challenge. We will update the userdata script to tell the consul process we are expecting 5 nodes (via the bootstrap-expect flag.
Here’s the updated script:
# Get my IP address.
IP=$(curl http://169.254.169.254/latest/meta-data/local-ipv4)
echo "Instance IP is: $IP"

# Start the Consul server.
docker run -d --net=host \
    --name=consul \
    consul agent -server -ui \
    -bind="$IP" \
    -client="0.0.0.0" \
    -bootstrap-expect="5"
The problem is this won’t work… We need to tell each node the address of another server in the cluster. For example, if we start five nodes, we should tell nodes 2-5 the address of node 1, so that the nodes can discover each other.
The challenge is how do we get the IP of node 1? The IP addresses are determined by the network, we don’t preset them so cannot hard code them. Also, we can expect nodes to occasionally die and get recreated, so the IP addresses of nodes will in fact change over time.
Getting the IP addresses of nodes in the cluster
There’s a nice trick we can use here. We can ask AWS to give us the IP addresses of each host in the auto-scaling group. If we tell each node the addresses of the other nodes, then they will elect a leader themselves10.
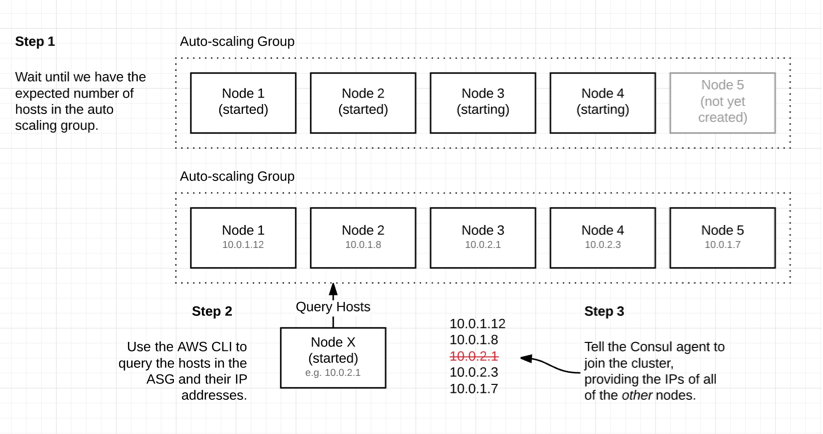
There are a couple of things we need to do to get this right. First, update the userdata script to provide the IPs of other nodes when we’re starting up, then update the role of our nodes so that they have permissions to use the APIs we’re going to call.
Getting the Cluster IPs
This is actually fairly straightforward. We update our userdata script to the below:
# A few variables we will refer to later...
ASG_NAME=consul-asg
REGION=ap-southeast-1
EXPECTED_SIZE=5

# Return the id of each instance in the cluster.
function cluster-instance-ids {
    # Grab every line which contains 'InstanceId', cut on double quotes and grab the ID:
    #    "InstanceId": "i-example123"
    #....^..........^..^.....#4.....^...
    aws --region="$REGION" autoscaling describe-auto-scaling-groups \
        --auto-scaling-group-name $ASG_NAME \
        | grep InstanceId \
        | cut -d '"' -f4
}

# Return the private IP of each instance in the cluster.
function cluster-ips {
    for id in $(cluster-instance-ids)
    do
        aws --region="$REGION" ec2 describe-instances \
            --query="Reservations[].Instances[].[PrivateIpAddress]" \
            --output="text" \
            --instance-ids="$id"
    done
}

# Wait until we have as many cluster instances as we are expecting.
while COUNT=$(cluster-instance-ids | wc -l) && [ "$COUNT" -lt "$EXPECTED_SIZE" ]
do
    echo "$COUNT instances in the cluster, waiting for $EXPECTED_SIZE instances to warm up..."
    sleep 1
done

# Get my IP address, all IPs in the cluster, then just the 'other' IPs...
IP=$(curl http://169.254.169.254/latest/meta-data/local-ipv4)
mapfile -t ALL_IPS < <(cluster-ips)
OTHER_IPS=( ${ALL_IPS[@]/${IP}}/} )
echo "Instance IP is: $IP, Cluster IPs are: ${CLUSTER_IPS[@]}, Other IPs are: ${OTHER_IPS[@]}"

# Start the Consul server.
docker run -d --net=host \
    --name=consul \
    consul agent -server -ui \
    -bind="$IP" \
    -retry-join="${OTHER_IPS[0]}" -retry-join="${OTHER_IPS[1]}" \
    -retry-join="${OTHER_IPS[2]}" -retry-join="${OTHER_IPS[3]}" \
    -bootstrap-expect="$EXPECTED_SIZE"
Right, here’s what’s going on:
- We create a few variables we’ll use repeatedly
- We create a
cluster-instance-idsfunction which returns the ID of each instance in the auto-scaling group - We create a
cluster-ipsfunction which returns the private IP address of each instance in the cluster. - We wait until the auto-scaling group has our expected number of instances (it can take a while for them all to be created)
- We get the 5 IP addresses
- We remove our IP from the array, leaving us with the IPs of the other nodes
- We start the Consul agent in server mode, expecting 5 nodes and offering the IP of each other agent
The problem is, if we try to run the script we will fail, because calling the AWS APIs requires some permissions we don’t have. Let’s fix that.
Creating a Role for our nodes
Our nodes now have a few special requirements. They need to be able to query the details of an auto-scaling group and get the IP of an instance11.
We will need to create a policy which describes the permissions we need, create a role, attach the policy to the role and then ensure our instances are assigned the correct role. This is consul-node-role.tf file:
//  This policy allows an instance to discover a consul cluster leader.
resource "aws_iam_policy" "leader-discovery" {
    name = "consul-node-leader-discovery"
    path = "/"
    policy = <<EOF
{
    "Version": "2012-10-17",
    "Statement": [
        {
            "Sid": "Stmt1468377974000",
            "Effect": "Allow",
            "Action": [
                "autoscaling:DescribeAutoScalingInstances",
                "autoscaling:DescribeAutoScalingGroups",
                "ec2:DescribeInstances"
            ],
            "Resource": [
                "*"
            ]
        }
    ]
}
    EOF
}

//  Create a role which consul instances will assume.
//  This role has a policy saying it can be assumed by ec2
//  instances.
resource "aws_iam_role" "consul-instance-role" {
    name = "consul-instance-role"
    assume_role_policy = <<EOF
{
    "Version": "2012-10-17",
    "Statement": [
        {
            "Action": "sts:AssumeRole",
            "Principal": {
                "Service": "ec2.amazonaws.com"
            },
            "Effect": "Allow",
            "Sid": ""
        }
    ]
}
EOF
}

//  Attach the policy to the role.
resource "aws_iam_policy_attachment" "consul-instance-leader-discovery" {
    name = "consul-instance-leader-discovery"
    roles = ["${aws_iam_role.consul-instance-role.name}"]
    policy_arn = "${aws_iam_policy.leader-discovery.arn}"
}

//  Create a instance profile for the role.
resource "aws_iam_instance_profile" "consul-instance-profile" {
    name = "consul-instance-profile"
    roles = ["${aws_iam_role.consul-instance-role.name}"]
}
Terraform is a little verbose here! Finally, we update our launch configuration to ensure that the instances assume this role.
resource "aws_launch_configuration" "consul-cluster-lc" {
    // Add this line!!
    iam_instance_profile = "${aws_iam_instance_profile.consul-instance-profile.id}"
    }
}
Let’s create the cluster again, with terraform apply. When we log into the UI we should now see a cluster containing all five nodes:
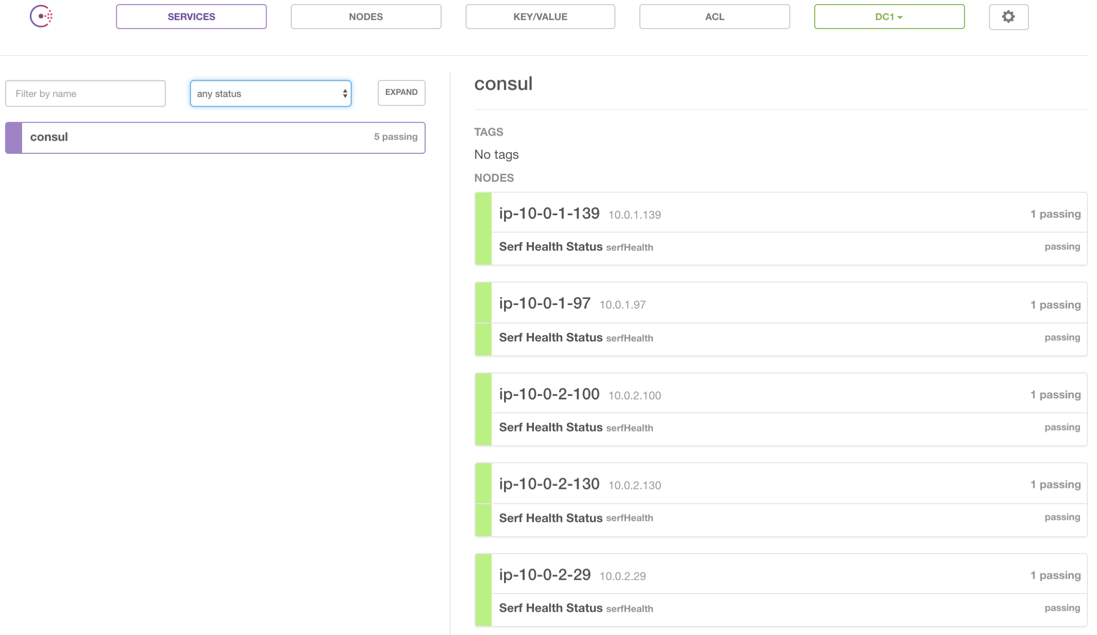
This code is all in the Step 3 branch.
If you are familiar with Consul, this may be all you need. If not, you might be interested in seeing how we actually create a new instance to host a service, register it with Consul and query its address.
Step 4 - Adding a Microservice
I’ve created a docker image for as simple a microservice as you can get. It returns a quote from Futurama’s Zapp Brannigan. The image is tagged as dwmkerr/zapp-service.
On a new EC2 instance, running in either subnet, with the same roles as the Consul nodes, we run the following commands:
# Install Docker
sudo su
yum update -y
yum install -y docker
service docker start

# Get my IP and the IP of any node in the server cluster.
IP=$(curl http://169.254.169.254/latest/meta-data/local-ipv4)
NODE_ID=$(aws --region="ap-southeast-1" autoscaling describe-auto-scaling-groups --auto-scaling-group-name "consul-asg" \
    | grep InstanceId \
    | cut -d '"' -f4 \
    | head -1)
NODE_IP=$(aws --region="ap-southeast-1" ec2 describe-instances \
    --query="Reservations[].Instances[].[PrivateIpAddress]" \
    --output="text" \
    --instance-ids="$NODE_ID")

# Run the consul agent.
docker run -d --net=host \
  consul agent \
  -bind="$IP" \
  -join=$NODE_IP

# Run registrator - any Docker images will then be auto registered.
docker run -d \
    --name=registrator \
    --net=host \
    --volume=/var/run/docker.sock:/tmp/docker.sock \
    gliderlabs/registrator:latest \
      consul://localhost:8500

# Run the example microservice - registrator will take care of letting consul know.
docker run -d -p 5000:5000 dwmkerr/zapp-service
What’s going on here?
- We grab our own IP address and the IP address of the first instance we find in the server cluster, using the same tricks as before
- We run the Consul agent - telling it the IP to use to join the cluster
- We run Registrator, a handy utility which will automatically register any new services we run to Consul
- We run a goofy sample microservice (which registrator will register for us)
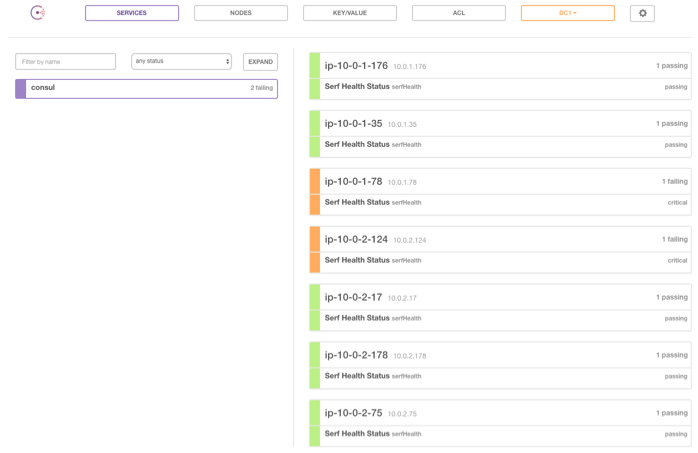
Now we can check the Consul UI:
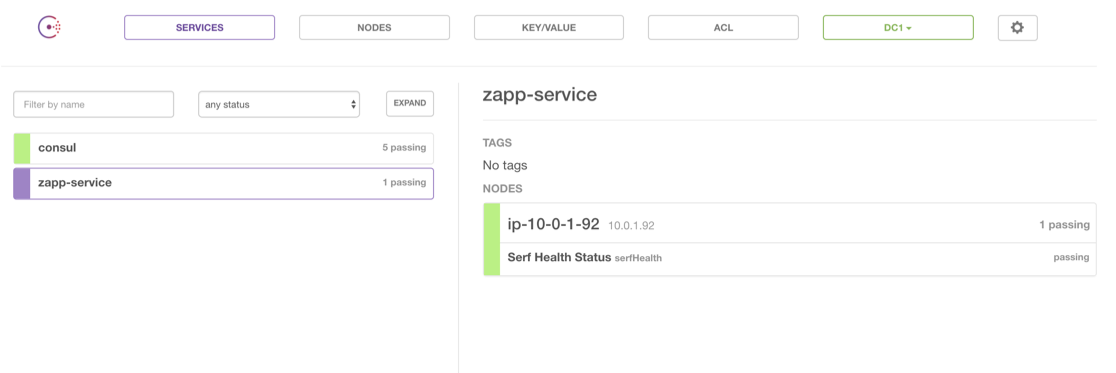
And there we have it. Our new node joins the cluster (as a client), we can register a new service with Consul.
We can call this service from any node in the subnet, seeing output like the below:
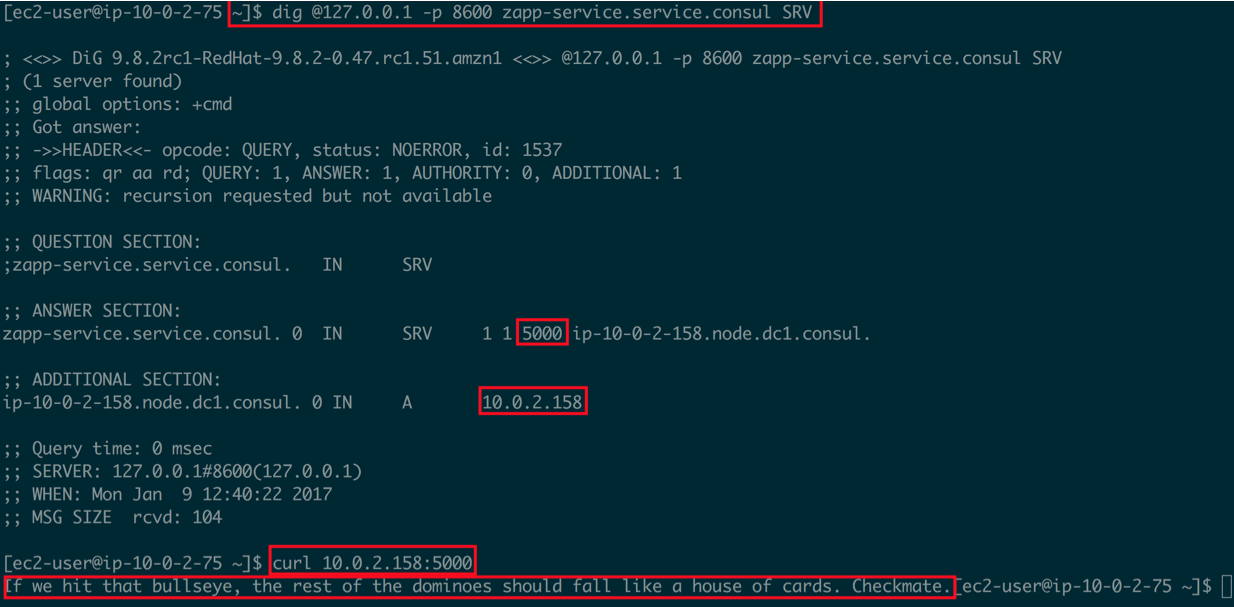
In this example, I used a DNS SRV query to ask where the zapp-service is, was told it was at 10.0.2.158 on port 5000, then called the service, receiving a response. I can discover any service using this method, from any node. As services are added, removed, moved etc, I can ask Consul for accurate information on where to find them.
Check the Step 4 branch to see the code in its current state.
Step 5 - Spanner Throwing
We can now try to throw some spanners in the works, to see how resilient the system is.
According to the Deployment Table from the Consul documentation, a cluster of five nodes means we have a quorum of three nodes (i.e. a minimum of three nodes are needed for a working system). This means we can tolerate the failure of two nodes.
The easiest way to test this is to simply manually kill two nodes:
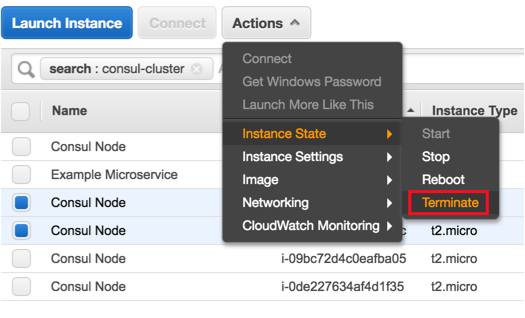
If we pick two random nodes, as above, and terminate them, we see the cluster determines that we have two failed nodes but will still function (if one was the leader, a new leader will be automatically elected):
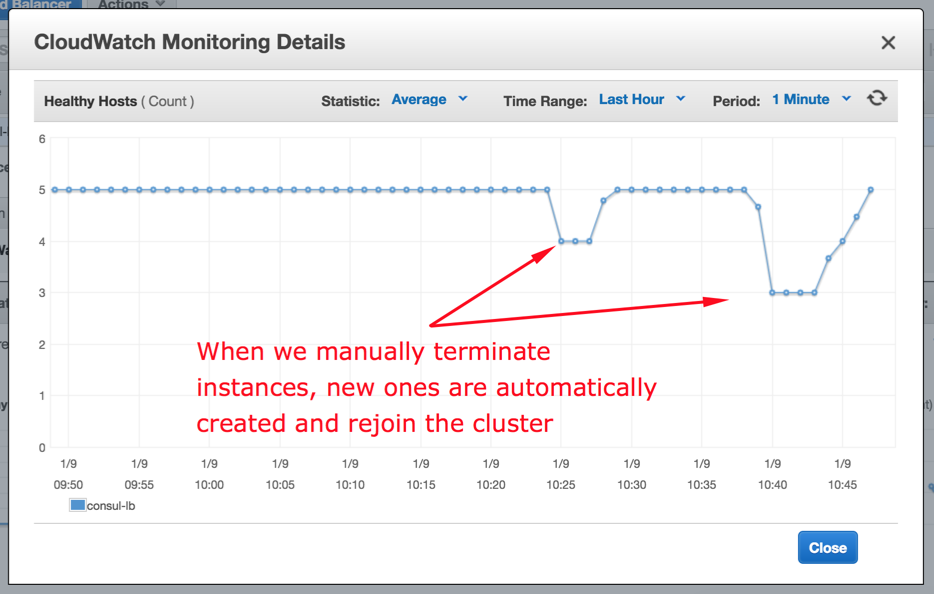
What’s nice about this setup is that no manual action is needed to recover. Our load balancer will notice the nodes are unhealthy and stop forwarding traffic. Our auto-scaling group will see the nodes have terminated and create two new ones, which will join the cluster in the same way as the original nodes. Once they join, the load balancer will find them healthy and bring them back into rotation.
We can see from the load balancer monitoring that it notices we have unhealthy nodes and also notices when new ones come into service:
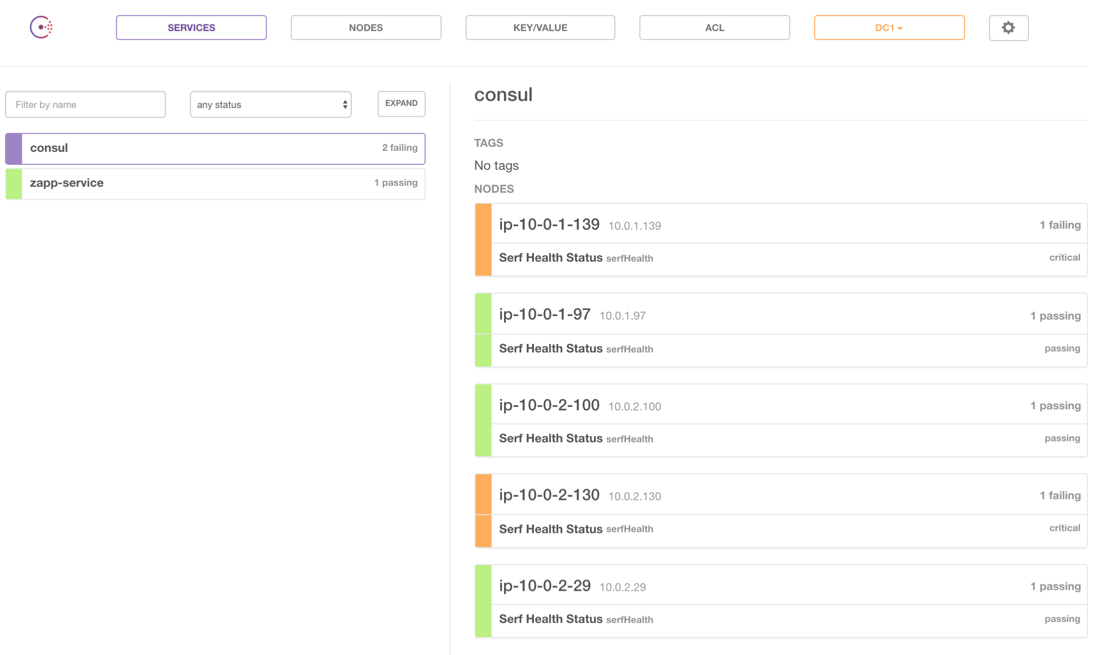
A quick check of the admin dashboard shows we now have a recovered system, with five healthy nodes:
The nodes which were terminated are still listed as failing. After 72 hours Consul will stop trying to periodically reconnect to these nodes and completely remove them12.
Wrapping Up
Hopefully this should provide a good starting point to think about building your own resilient and robust systems for services like Consul.
Interesting areas to look into to extend the project would be:
- Setting up alerts so that if we lose more than one node, we are informed
- Automating resilience tests by programatically bringing down servers and monitoring how long it takes the system to return to five nodes
- Instead of using a userdata script to set up a node, bake it into a new custom AMI with Packer
- Adding alerts for if we lose three of more nodes, which always requires manual intervention (see Outage Recovery)
As always, any questions or comments are welcome! All code is available at github.com/dwmkerr/terraform-consul-cluster.
Appendix 1: Logging
Small typos or mistakes in the userdata script are almost impossible to effectively diagnose. The scripts were actually built in the following way:
- Draft a script on my local machine which configures script logging and CloudWatch13
- Spin up a new EC2 instance manually
- SSH onto the instance, and run the script line by line until I’m sure it’s right
- Ensure the logs are forwarded to CloudWatch, then add the more complex features and repeatedly test
I’ve included CloudWatch logging in the code. In this write-up I’ve omitted this code as it is purely for diagnostics and doesn’t contribute to the main topic. The setup is in the consul-node.sh and consul-node-role.tf files.
If you want more details, let me know, or just check the code. I would heartily recommend setting up logging like this for all but the most straightforward projects:
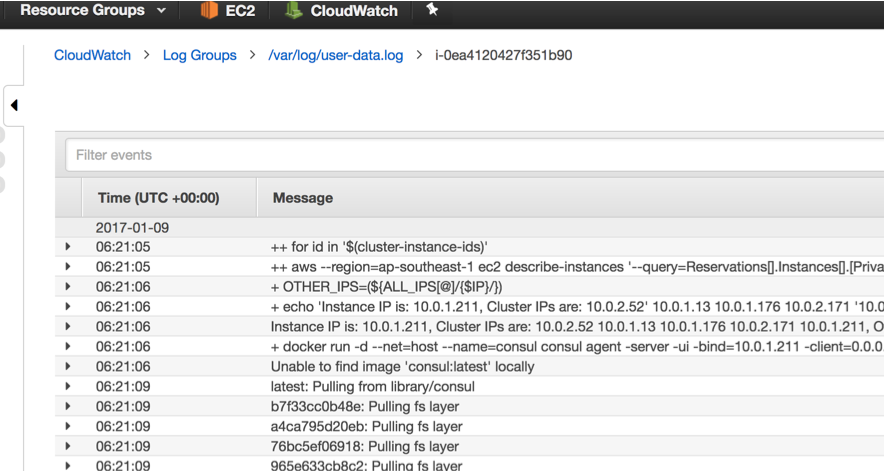
Being able to diagnose issues like this is vital when working with distributed systems which may be generating many log files.
Appendix 2: Modularisaton
I got some a great PR from arehmandev which modularises the code. This makes it more reusable and cleans up the structure significantly. If you want to see the before/after, check the original PR at https://github.com/dwmkerr/terraform-consul-cluster/pull/4.
Footnotes
Further Reading
- Consul - Consensus Protocol
- What you have to know about Consul and how to beat the outage problem, John Koepi
This kind of pattern is critical in the world of microservices, where many small services will be running on a cluster. Services may die, due to errors or failing hosts, and be recreated on new hosts. Their IPs and ports may be ephemeral.It is essential that the system as a whole has a registry of where each service lives and how to access it. Such a registry must be resilient, as it is an essential part of the system. ↩︎
Most popular is a fairly loose term. Well ranked by Gartner and anecdotally with the largest infrastructure footprint. https://www.gartner.com/doc/reprints?id=1-2G2O5FC&ct=150519&st=sb ↩︎
This is AWS parlance again. An availabilty zone is an isolated datacenter. Theoretically, spreading nodes across AZs will increase resilience as it is less likely to have catastrophic failures or outages across multiple zones. ↩︎
I don’t get money from Udemy or anyone else for writing anything on this blog. All opinions are purely my own and influenced by my own experience, not sponsorship. Your milage may vary (yada yada) but I found the course quite good: https://www.udemy.com/aws-certified-solutions-architect-associate/. ↩︎
For more expert readers that may sound horribly patronising, I don’t mean it to be. For many less experienced technologists the basics of networking might be more unfamiliar! ↩︎ ↩︎
A common pattern is to actually make the group size dynamic, responding to events. For example, we could have a group of servers which increases in size if the average CPU load of the hosts stays above 80% for five minutes, and scales down if it goes below 10% for ten minutes. This is more common for app and web servers and not needed for our system. ↩︎
Specifically, the current latest Amazon Linux AMI. ↩︎
Check the admin UI every 30 seconds, more than 3 seconds indicates a timeout and failure. Two failures in a row means an unhealthy host, which will be destroyed, two successes in a row for a new host means healthy, which means it will receive traffic. ↩︎
This is a fairly sophisticated topic in itself, see Consul - Consensus Protocol for details. ↩︎
In fact, we actually have more permissions required, because in the ‘real’ code we also have logs forwarded to CloudWatch. ↩︎
These nodes can be removed manually, see Consul Force Leave. ↩︎
Amazon’s service for managing and aggregating logs ↩︎