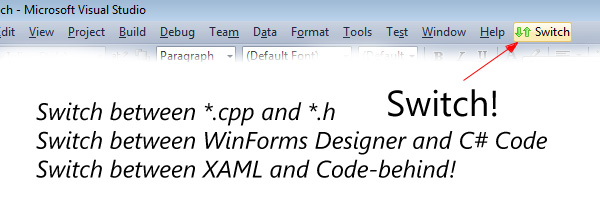
Switch

Download Switch Installer

Switch is an Addin for Visual Studio 2008, 2010 and 2012 that lets you quickly switch between related files. Typically you set up the Switch command somewhere easily accessible, and then just hit it everytime that you want to flick between related files. Here’s some examples of what it’ll switch between:

  1. C++ Files (cpp to h etc).
  2. WinForms Code-behind and Designer
  3. WPF/Silverlight/Windows Phone XAML and Code-behind
  4. ASPX Markup and code-behind
  5. Interface and implementation
Basically, if you are in a file that has some other kind of related file (or files) Switch will let you flick between them quickly. I originally wrote this to switch between C++ header and implementation, but find it equally useful for designers and code-behind.

Installing Switch

To install Switch, download the installer from the Switch Page on Visual Studio Gallery, or the Switch Setup zip attached to this page, and run the installer.

Visual Studio 2012 Issues

Some people have noticed that if they had the Visual Studio 2012 RC installed and then upgraded to RTM, then the installation doesn’t work for VS 2012. In this case, move the files from the Addins folder of the ‘Visual Studio 2012′ folder in your Documents directory to the ‘Addins’ folder of the ‘Visual Studio 11′ folder.

Configuring Switch

Note: The instructions below apply equally to Visual Studio 2008, 2010 and 2012.

To configure switch, first go to the ‘Tools > Customise’ menu. Choose ‘Commands’ and move the selection in the list of commands to the bottom of the window:

Now choose ‘Add Command’ – Switch will be located in the ‘Addins’ group:

Hit OK – Switch will now be available from the main menu bar. You can also configure hotkeys for Switch through the same interface.

Other Links

Switch is available on the Visual Studio Gallery: http://visualstudiogallery.msdn.microsoft.com/e50c0328-97a1-4842-8821-f0a82640245a

There’s an article on the CodeProject describing how to create Visual Studio Addins – this article describes how Switch was created: http://www.codeproject.com/Articles/324611/Extending-Visual-Studio-Part-2-Creating-Addins

9 thoughts on “Switch

    1. Dave Kerr Post author

      Hi Rami – thank you VERY much for letting me know about this – I’ll look over the issue today and reply here again once it’s fixed – thanks again for the heads up :)

      Reply
  1. sergegers

    Hi! Nice stuff, but your Visual Studio msi package doesn’t work. I used installer from Code Project article.

    Reply
  2. Pingback: Switch Updated | dwmkerr.com

    1. Dave Kerr Post author

      In Visual Studio, you go to Tools > Customise.
      On the dialog that appears, choose ‘Keyboard…’.
      Now you have the options page open in the Keyboard section, in the ‘Show commands containing’ box, type in ‘switch’.
      In VS2010, you’ll see a command named ‘Switch2010.Connect.Switch2010′, in VS 2012 you’ll see ‘Switch2012.Connect.Switch2012′ – select the command and then in the box under the text ‘Press shortcut keys’, enter your shortcut key. Now press ‘Assign’ and OK – all done!

      Reply

Leave a Reply

Your email address will not be published. Required fields are marked *

You may use these HTML tags and attributes: <a href="" title=""> <abbr title=""> <acronym title=""> <b> <blockquote cite=""> <cite> <code> <del datetime=""> <em> <i> <q cite=""> <strike> <strong>