This is the third part of my Effective Shell series - practical examples of ways to be more efficient with everyday tasks in a shell.
- Part 1: Navigating the Command Line
- Part 2: Become a Clipboard Gymnast
- Part 3: Getting Help
- Part 4: Moving Around
- Part 5: Interlude - Understanding the Shell
- Part 6: Everything You Don’t Need to Know About Job Control
- Part 7: The Subtleties of Shell Commands
In this article I’ll show you how to quickly get help when working with tools in the shell, without disrupting your flow!
Getting Help is Important!
If you are trying to be more effective when using the shell, it is crucial to know how to quickly look things up.
There’ll be many circumstances where you’ll need to open a browser to search for help, but there’s also a wealth of information only a few keystrokes away. Looking up parameters, checking how to run commads, C library docs or useful information like ASCII charts are available directly in the system.
Before we look at the standard way of accessing documentation on unix-like systems, which is the man command, I’m going to introduce tldr.
Nine times out of ten I get the help I need in a few seconds with tldr, so if you take only one thing away from the article, take the first section. Then if you want to learn more about the system manuals, read on!
tl;dr
Let’s say I need to find and replace some text in a file. I know I can do this with the sed command, but have forgotten the syntax.
All I need to do is run tldr sed:
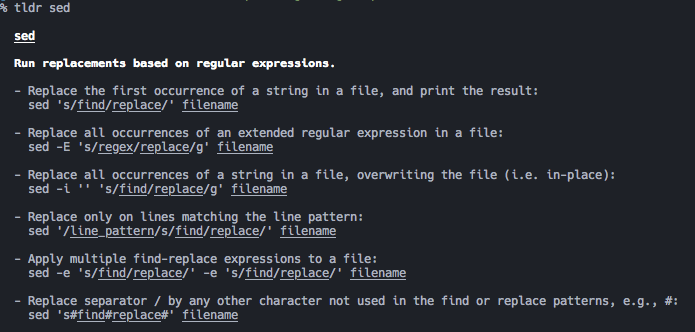
The first example is exactly what I’m looking for. Now for any more detail than a few basic examples, I’m going to have to go to the manual, but it’s overkill for the basics. Here’s what man sed shows me:
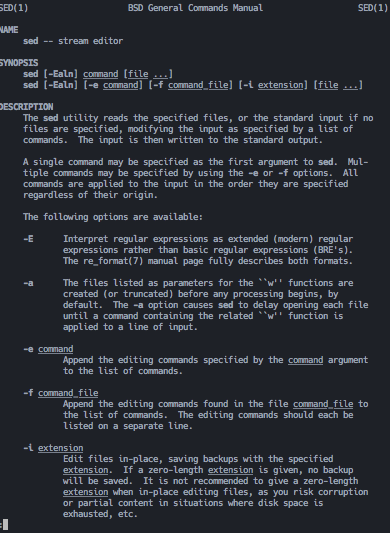
And this is just page one of six! There’s a lot of detail, which is great sometimes, but for a quick lookup, tldr is perfect.
You can install the tldr tool with npm install -g tldr. It’s open source and community maintained.
Now a lot of the time, you are still going to need more help or more detail. For the rest of the article, we’ll dive a bit deeper into man, the system manual pages.
Understanding ‘man’
Most tools you encounter in the shell have manual pages available. Many people will be familiar with the man command to get help on a tool, but let’s take a look in a bit more detail, there’s actually a lot more available than just the documentation for common commands.
Getting help on a command
The most basic way to get help on a command is with man. Here’s an example:
$ man cp


CP(1)                     BSD General Commands Manual                    CP(1)

NAME
     cp -- copy files

SYNOPSIS
     cp [-R [-H | -L | -P]] [-fi | -n] [-apvX] source_file target_file
     cp [-R [-H | -L | -P]] [-fi | -n] [-apvX] source_file ...
        target_directory

DESCRIPTION
     In the first synopsis form, the cp utility copies the contents of the
     source_file to the target_file.  In the second synopsis form, the con-
     tents of each named source_file is copied to the destination
     target_directory.  The names of the files themselves are not changed.  If
     cp detects an attempt to copy a file to itself, the copy will fail.

...
The man command opens the manual for the given tool. These manuals should contain all command line options and details of how to use the tool.
You can scroll up and down through the content with the arrow keys, this is because the information is presented in the shell pager, which is a tool for looking through content which might not easily fit on a screen.
Using the pager
The first thing you might notice is that you can move through the manual pages with the arrow keys.
Manpages are just text files, and man opens them in a pager tool, which is what is providing the keyboard interface to look through the file.
On most systems, the pager will be the less program. There are lots of commands you can use to navigate through files with less, but the bare essentials are:
d- Scroll down half a pageu- Scroll up half a pagej/k- Scroll down or up a line. You can also use the arrow keys for thisq- Quit/<search>- Search for textn- When searching, find the next occurrenceN- When searching, find the previous occurrence
There are many other commands, but the set above is normally what I find myself using the most.
If you are interested, you can actually see what your pager is with the command below:
$ echo $PAGER
less
The $PAGER environment variable is used to tell the shell what program to use for paging. More details are found with man man.
You can put any text content into your pager - try this:
ls -al /usr/bin | less
This lists the contents of the /usr/bin folder, piping the output to less so we can easily scroll through it.
There are alternative pagers available (on many Unix-y systems you’ll have less, more and most) but in general you’ll normally get what you need with less.
What’s with the numbers?
You’ll often see tools referred to in manpages with numbers after them. Take a look at man less:
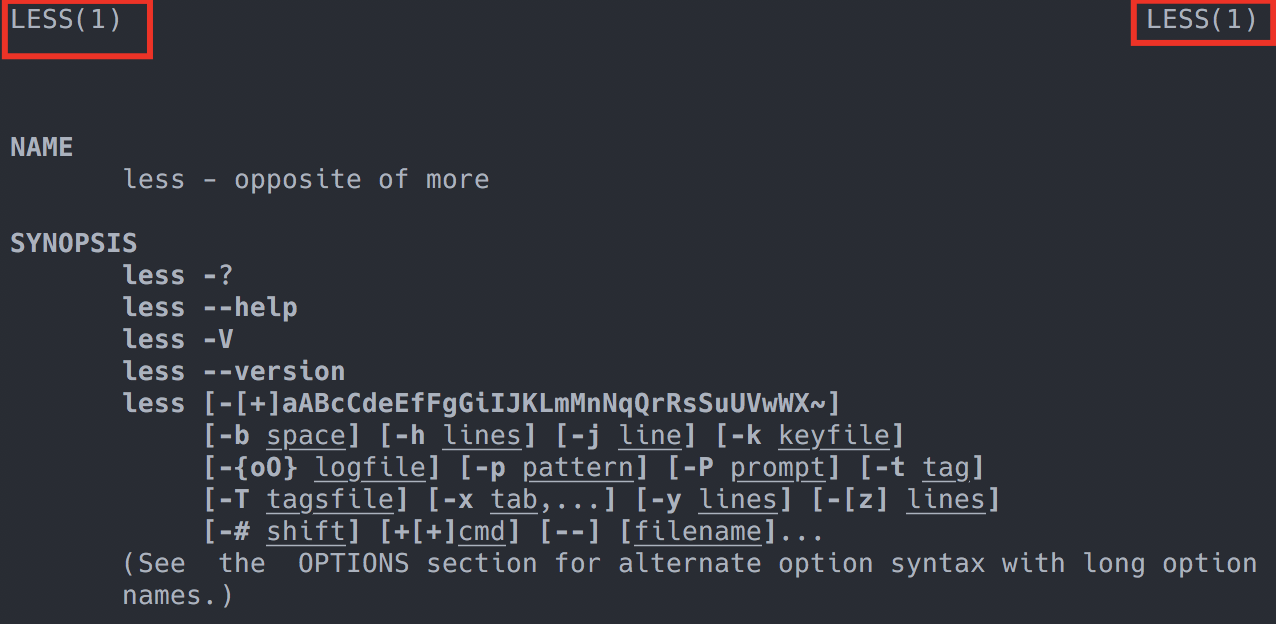
The number is the manual Section Number. The different sections of the manual are documented be found on most unix-like systems in man’s documentation, which you can check by running man man1. Here’s what you’d get on Ubuntu 16:
| 1 | Executable programs or shell commands | | 2 | System calls (functions provided by the kernel) | | 3 | Library calls (functions within program libraries) | | 4 | Special files (usually found in /dev) | | 5 | File formats and conventions eg /etc/passwd | | 6 | Games | | 7 | Miscellaneous (including macro packages and conventions), e.g. man(7), groff(7) | | 8 | System administration commands (usually only for root) | | 9 | Kernel routines [Non standard] |
We’ll go through the setions in detail shorltly.
You can specifically choose which section of the manual you are looking in by using:
man <section> <search>
You can also get more information about the sections themselves by opening up the intro page. For example:
$ man 1 intro

INTRO(1)                  BSD General Commands Manual                 INTRO(1)

NAME
     intro -- introduction to general commands (tools and utilities)

DESCRIPTION
     Section one of the manual contains most of the commands which comprise...
Why would you do this, and why would you care? A few examples from each section show how this can be quite useful to know about.
Section 1: Programs and Shell Commands
These are programs, probably what you are going to be looking up most regularly! For example, man 1 time shows:
TIME(1)                   BSD General Commands Manual                  TIME(1)

NAME
     time -- time command execution

SYNOPSIS
     time [-lp] utility

DESCRIPTION
     The time utility executes and times utility.  After the utility finishes, time writes the total time
     elapsed, the time consumed by system overhead, and the time used to execute utility to the standard
     error stream.  Times are reported in seconds.

...
Section 2: System Calls
You’ll probably not use this section unless you are doing systems programming2. This section contains info on the avaiable Linux Kernel system calls. For example, running man 2 chown gives:
CHOWN(2)                    BSD System Calls Manual                   CHOWN(2)

NAME
     chown, fchown, lchown, fchownat -- change owner and group of a file

SYNOPSIS
     #include <unistd.h>

     int
     chown(const char *path, uid_t owner, gid_t group);
...
Section 3: Library Calls
These are the manpages for the C standard library functions. For example, man 3 time:
TIME(3)                  BSD Library Functions Manual                  TIME(3)

NAME
     time -- get time of day

LIBRARY
     Standard C Library (libc, -lc)

SYNOPSIS
     #include <time.h>

     time_t
     time(time_t *tloc);
...
Here we can see why the sections are important to know about.
Running man time would not open the page above, because man searches the library in ascending section order, meaning that it actually finds time(1) and shows the pages for the time program, not the time C library call.
Because of the potential ambiguity of names if no section number is included, in lots of Linux documentation you’ll see the man section number written next to library calls, system calls, programs and so on (things will refer to sed(1) or time(3) for example.
Section 4: Devices
This section deals with the special devices which live in the /dev/* folder. For example, running man 4 random shows:
RANDOM(4)                BSD Kernel Interfaces Manual                RANDOM(4)

NAME
     random , urandom -- random data source devices.

SYNOPSIS
     pseudo-device random

DESCRIPTION
     The random device produces uniformly distributed random byte values of
     potentially high quality.
...
Again, we see that section numbers can be important. If you just run man random, you’ll see:
RANDOM(3)                BSD Library Functions Manual                RANDOM(3)

NAME
     initstate, random, setstate, srandom, srandomdev -- better random num-
     ber generator; routines for changing generators

LIBRARY
     Standard C Library (libc, -lc)

SYNOPSIS
     #include <stdlib.h>

     char *
     initstate(unsigned seed, char *state, size_t size);

     long
     random(void);
...
Which is the manpage for random(3), which is C library function, not the /dev/random file!
Section 5: File Formats
This section details special files in the system. For example, man 5 crontab shows:
CRONTAB(5)                  BSD File Formats Manual                 CRONTAB(5)

NAME
     crontab -- tables for driving cron

DESCRIPTION
     A crontab file contains instructions to the cron(8) daemon of the gen-
     eral form: ``run this command at this time on this date''.  Each user
     has their own crontab, and commands in any given crontab will be exe-
     cuted as the user who owns the crontab.  Uucp and News will usually
     have their own crontabs, eliminating the need for explicitly running
     su(1) as part of a cron command.
...
Which describes the crontab file used to define scheduled tasks. Again, this is different to man crontab which would document crontab(1). Similarly, man 5 passwd is going to show something quite different to man passwd.
Section 6: Games
Nothing says it better than man 6 intro itself (this’ll not work on a Mac sadly, but try it on another Linux system):
...
DESCRIPTION
       Section 6 of the manual describes all the games and funny little programs available on the system.
...
There are probably a few silly programs available on your system, here you’ll find their manuals. For example, man 6 banner on a Mac shows:
BANNER(6)                      BSD Games Manual                      BANNER(6)

NAME
     banner -- print large banner on printer

SYNOPSIS
     banner [-d] [-t] [-w width] message ...

DESCRIPTION
     Banner prints a large, high quality banner on the standard output.  If
     the message is omitted, it prompts for and reads one line of its stan-
     dard input.
...
This section is going to be highly dependent on your OS!
Section 7: Miscellaneous
This is where you’ll find additional assorted documentation. For example, man 7 ascii shows:
ASCII(7)             BSD Miscellaneous Information Manual             ASCII(7)

NAME
     ascii -- octal, hexadecimal and decimal ASCII character sets

DESCRIPTION
     The octal set:

     000 nul  001 soh  002 stx  003 etx  004 eot  005 enq  006 ack  007 bel
...
Section 8: System Commands
We’ve actually already seen one of these commands mentioned, in the manpage for crontab(5) it mentions cron(8). Let’s see, with man 8 cron:
CRON(8)                   BSD System Manager's Manual                  CRON(8)

NAME
     cron -- daemon to execute scheduled commands (Vixie Cron)

SYNOPSIS
     cron [-s] [-o] [-x debugflag[,...]]
These are commands which sysadmins would normally run. You might open section eight unexpectedly, for example man chmod will open chmod(1), but man chown will open chown(8), as it is a system command.
Some distributions might vary for Section Nine. On my Mac it contains information about the kernel interfaces, a C style guide and some more.
Getting the Index of Manual Section
Manpages are just files on the filesystem, so you can get the index of a section just by looking in the appropriate folder.
For example, to index the available system calls, try ls /usr/share/man/man2:
EV_SET.2
FD_CLR.2
FD_COPY.2
FD_ISSET.2
FD_SET.2
FD_ZERO.2
_exit.2
accept.2
access.2
acct.2
...
This is quick and easy way to see what sort of entries you have on your system. If you want to work out where an entry lives, use the -w flag:
$ man -w printf
/usr/share/man/man1/printf.1
Searching the Manual
You can search the manpage titles and summaries with man -k. For example, man -k cpu shows:
cpuwalk.d(1m)            - Measure which CPUs a process runs on. Uses DTrace
dispqlen.d(1m)           - dispatcher queue length by CPU. Uses DTrace
gasm(n), grammar::me::cpu::gasm(n) - ME assembler
You can find more advanced options for searching by using your newfound man skills on man itself.
That’s Enough!
I’d recommend tldr as a first-call for checking to see how to use a command.
man is a powerful tool to dive deeper into how programs and components of the system work. Like many tools which have been around for a long time, there’s a lot you can do with man. Much of it you’ll likely never need, so I’ve tried to keep this article to the basics.
Understanding manpage sections is useful - you’ll see them referenced again and again in documentation on the system and online.
I hope this helps you save some time when you are working! Please let me know in the comments if you have any questions or thoughts.
You can also check out the rest of the effective shell series.
Appendix: Dash
As a final note, if you find yourself using man a lot because you work offline (I fly a lot so find it very helpful when on a plane with no WiFi), you should also look at Dash3.
Dash is simply an offline documentation aggregator. It can download online manuals for many, many different programming languages, frameworks, technologies and so on. I actually have a vim keyboard command to open the word under the cursor in dash, with the documentation automatically set based on the type of the file.
This is super-useful if you are offline at lot and need more sophisticated offline documentation. You can find out more about it at https://kapeli.com/dash.
Footnotes
Weirdly satisfying to run. ↩︎
Which it is always fun to try if you get the chance, and a great way to learn more about the fundamentals of the operating system. ↩︎
Dash is a paid product. Full disclosure - I don’t get any money from them or anyone else to write about anything, all content is 100% based on my experiences. I don’t run ads on my site either. ↩︎