Feeling like having a go with Facebook’s hugely popular React framework but not sure where to start?
In this post I’m going to build a simple React application from scratch - using ECMAScript 6.
We’ll put together the bare minimum skeleton of a site and keep the folder structure free of noise and clutter so that you can focus on the app code and not the tooling!
The simple app we’ll build is at github.com/dwmkerr/react-es6-starter, or see it live.
Building the Code
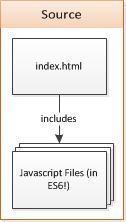
Our goal will be to have a single index.html file which includes our Javascript files. We’re aiming for something like this:
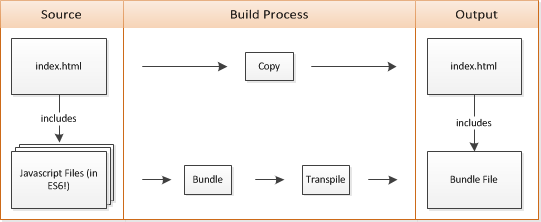
But browsers don’t handle ES6 yet. So our loose files, which reference each other, are going to have to be transpiled into ES5 and bundled into a single file. We need a build process:
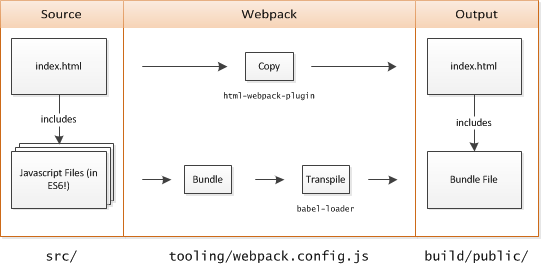
Webpack can handle all of this for us. Given an entrypoint file, webpack will traverse all of the require and import statements and build a single bundle file. It also allows us to configure ’loaders’, which let us pass these files through other tools:
We’ll need the following libraries:
- Webpack - the tool that handles the build process.
- Babel - an excellent ES6/ES7/JSX to ES5 transpiler.
- Babel Loader - the component which integrates Babel into our Webpack build.
- Html Webpack Plugin - a simple Webpack plugin which will copy our index file to our build folder and add a link to our Webpack bundle.
Let’s install these modules:
npm install --save webpack babel babel-loader html-webpack-plugin
We’ll also need a webpack config file. By default webpack expects a file named webpack.config.js to be in the root of the project. But every tool under the sun wants to stick its config file in the root of our project, and most of the time they’re just in the way.
So let’s put everything to do with our tooling in a tooling folder instead. Create the file webpack.config.js in a tooling folder in the root of the project:
var path = require('path');

module.exports = {

  //  Defines the entrypoint of our application.
  entry: path.resolve(__dirname, '../src/app.js'),

  //  Bundle to a ./build/public/bundle.js file.
  output: {
    path: path.resolve(__dirname, '../build/public'),
    filename: 'bundle.js'
  },

  //  Use babel for anything that is *.js or *.jsx.
  module: {
    loaders: [
      {
        test: /\.jsx?$/,
        loader: 'babel-loader',
        include: path.resolve(__dirname, '../src')
      }
    ]
  }
};
First we define our entry point - the first file which will actually be run if we run the final bundled script. This is the app.js file we’ll create shortly. If app.js includes other modules, Webpack will pick them up, if those modules include other modules, they will be picked up and so on.
Next we specify that everything should be bundled into a ./build/public/bundle.js file (we’re going to use the convention that everything we can produce with our tools goes into ./build).
Finally, we specify that every file in src which matches the \.jsx?$ regex will go through the babel loader.
Using ES6!
We’ve actually got enough now to use ES6. Create a file in src called index.html:
<!DOCTYPE html>
<html>
<body>
</body>
</html>
Then create a src/app.js file:
const PI = 3.14;
let vals = [1, 2, 3].map(x => x*2);
document.body.innerText = "Pi is " + 3.14 + " and vals is " + vals;
Run the command ./node_modules/.bin/webpack --config ./tooling/webpack.config.js and our code is built, transpiled an moved to the build folder.
Now we could serve this folder using any basic webserver. We are already using webpack, so the webpack dev server will do the trick. It uses exactly the same config file as the webpack tool:
npm install --save-dev webpack-dev-server
./node_modules/.bin/webpack-dev-server --config ./tooling/webpack.config --inline
The inline reloads the page when the source changes. We don’t need to tell the server where the files are, it knows that from the webpack config.
Let’s stick these commands in our package.json for convenience:
{
  ...
"scripts": {
    "start": "webpack-dev-server --config ./tooling/webpack.config.js --inline --quiet",
    "webpack": "webpack --config tooling/webpack.config.js"
  ...
}
Now we can manually build with npm run webpack and start our dev server with npm start.
Adding some React
Let’s add a React component. Create a folder under app called home and add a home.js file:
import React from 'react';

export default class Home extends React.Component {
  render () {
    return <div>
        <h1>React ES6 Starter</h1>
        <p>Welcome to the React ES6 Starter home page!</p>
      </div>;
  }
}
This is our first react component, which does nothing more than render some basic markup. We’ll use this as the starting point for our application.
We can now take our app.js file and render our Home component into the div. Here’s app.js:
import React from 'react/addons';
import Home from './home/home';

React.render(<Home />, document.body);
That’s all there is to it! We’ve got a clean and simple starting point to begin playing with React. Before we look into things like state management and routing, let’s look into testing what we have so far.
Testing
Even the most simple app would be incomplete without looking into how we will deal with the testing.
Many will recommend the Jest framework to test React applications. However, it’s a bit more to learn and has some problems with NodeJS v0.12, so until we get Node v4 I’m going to keep things simple.
First, we’ll install Karma as a test runner. We’ll use Jasmine as as framework to write test cases and PhantomJS as a headless browser in which our tests will run. This means we’ll need to add some more dev dependencies:
npm install --save-dev karma jasmine karma-webpack karma-jasmine karma-phantomjs-launcher
We can now create a karma.config.js file in our tooling folder:
var path = require('path');

module.exports = function(config) {
  config.set({
    browsers: ['PhantomJS'],
    files: [
      //  We need to polyfill as PhantomJS doesn't support 'bind'.
      '../node_modules/babel-core/browser-polyfill.js',
      '../**/*.spec.js'
    ],
    frameworks: ['jasmine'],
    preprocessors: {
      '../**/*.spec.js': ['webpack'],
    },
    reporters: ['progress'],
    singleRun: true,
    webpack: {
      module: {
        loaders: [
          {
            test: /\.jsx?$/,
            loader: 'babel-loader',
            include: path.resolve(__dirname, '../src')
          }
        ],
      }
    },
    webpackServer: {
      noInfo: true
    }
  });
};
So here we are:
- Loading a polyfill from babel core (sorry guys, one more
npm install --save-dev babel-core) which gives PhantomJS thebindfunction (along with some others). This is needed as some of the testing code in the browser needs these features. - Specifying that anything that ends in
.spec.jsshould be loaded. - Running anything that ends in
.spec.jsthrough webpack. - Telling webpack to use babel.
Quite a bit of config, but we’re re-using the same webpack tooling as before. We run the code through webpack, which sends it through babel and builds ES5 we can test in the browser.
With this in place, we can write a spec. Add home.spec.js to the home folder:
import React from 'react';
import $ from 'jquery';
import Home from './home.js';

describe('Home', () => {

  it('should render to the DOM', function() {

    //  Create the <Home /> react component.
    var component = React.render(<Home />, document.body);

    //  Find the DOM element for the created component.
    var node = React.findDOMNode(component);

    //  Check the DOM looks how we'd expect it to.
    expect($(node).children('h1').text()).toEqual("React Redux Starter");

  });

});
What’s going on here? We just ask React to render our Home component directly into the DOM. We get a component back from this call. We can then ask React to give us the DOM associatefd with the component and use familiar tools (jQuery!) to test the shape of the generated DOM.
All that’s missing is the last of the dev dependencies we’ve missed:
npm install --save-dev jquery phantomjs
We can run tests directly on a Mac or Unix with:
./node_modules/.bin/karma start ./tooling/karma.config.js
For Windows use:
node_modules\.bin\karma start tooling\karma.config.js
In fact, we’ll update our package.json scripts so that this is the test command:
"scripts": {
  "test": "./node_modules/.bin/karma start ./tooling/karma.config.js",
  ...
Done! This means we can run tests on any platform with NodeJS1 using the same command - npm test.
We now have a very simple setup which allows us to run tests. You can build on this - perhaps adding Jest later or a more sophisticated or React specific set of tools.
Adding Code Coverage
You might want to add some code coverage information to your project. This can be a little tricky when using ES6, as we need to make sure we report coverage of the original ES6 code, rather than the actual transpiled code which is instrumented.
Fortunately, with the clean and simple setup we have built, adding code coverage is a snap.
Our test runner, Karma, is built to quickly integrate with the code coverage tool Istanbul, we just need to use the Karma Coverage plugin. Let’s install the two modules:
npm install --save-dev istanbul karma-coverage
Now with a small addition to our karma.config.js file we will get a nice HTML coverage report. We need to update our reporters config to include coverage and specify coverage options in the coverageReporter config.
  reporters: ['progress', 'coverage'],
  coverageReporter: {
    dir: '../build/coverage/',
    type: 'html'
  }
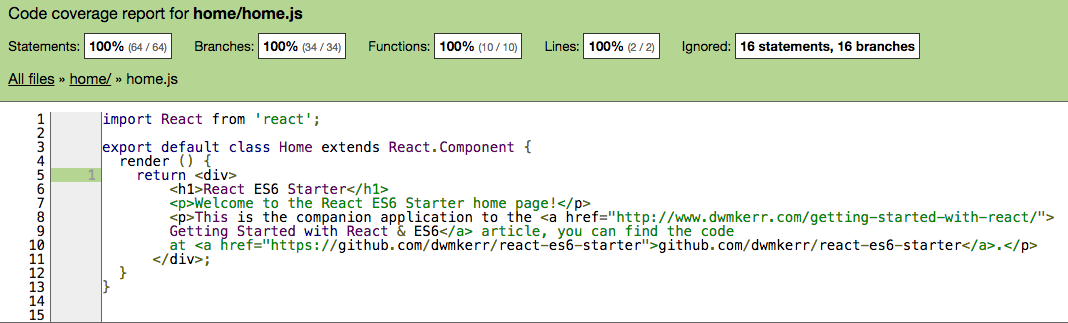
If you run npm test now, you’ll get an HTML coverage report generated. The only problem is that it is for the transpiled code, which makes it almost useless. A customer instrumenter called isparta will help us here. We use isparta to get a report of the coverage of the original ES6 code. Two more modules:
npm install --save-dev isparta isparta-instrumenter-loader
Then in our karma config we pass the orignal code through the insrtrumenter, before babel transpiles it:
webpack: {
  module: {
  preLoaders: [
    {
      test: /\.jsx?$/,
      exclude: [/node_modules/, /\.spec\.js/],
      loader: 'isparta-instrumenter-loader'
    },
  ],
  // everything else stays the same...
Anything that is not a spec or from node_modules gets instrumented. Now we have a ES6 code coverage report:
With this in place, you can go even further and integrate with other CI or publish to code quality systems (for example this repo integrates to coveralls.io). This is often used to show badges for repos:
![]()
Another use case is to gate checkins unless they maintain a certain code coverage threshhold.
Wrapping Up
This provides a very lean starting point for learning React. There’s no moving parts at the moment - no state management. We’ll get into that in later articles but right now you have a playground.
You can set up CI in a flash, just sign up for a Travis account and use a travis.yml like this:
language: node_js
node_js:
  - "0.12"
This repo is all ready to push to Heroku, no Procfile is needed. Check out react-es6-starter.herokuapp.com to see the code in action.
I hope you’ve found this article useful! Next time we’ll be getting into the details of managing state in React.
Please fork the repo and have a play, let me know of any suggestions or improvements!
github.com/dwmkerr/react-es6-starter
Glossary of Conventions
There are a few conventions that I personally use in most Javascript projects. The conventions used in this article which I think are valuable to consider using in many projects are:
Always support install/test/start
Everyone should always be able to checkout, install, test and run the code with the following commands:
npm install # installs everything needed
npm test    # lets the user know the code works right on their system!
npm start   # starts the code, lets the user know what to do next
Install should setup everything, and if code needs to be built to be testable, this should be a post-install hook.
Test should be run next, as a user should be able to verify that the code works as expected on their system.
Finally, when the user runs start, a dev server (as convention dictates we are in a dev mode by default (and production mode is set with a flag or environment variable) the server should start and a console message should show the user where to browse to.
Footnotes
-
IBM Mainframes anyone? ↩︎