tl;dr - vsix-tools fixes the ‘Invalid Multiple Files in VSIX’ issue on the Visual Studio Gallery and lets you set vsix version numbers with Powershell.
I maintain a reasonably large project called SharpGL. This project contains two Vsix packages (Visual Studio Extensions), each of which contains project templates for Visual Studio.
If you have ever worked with Vsix files before you might have noticed that the tools for them in Visual Studio seem a little flaky - but even more so is that Visual Studio Gallery site that you have to use to upload your extensions.
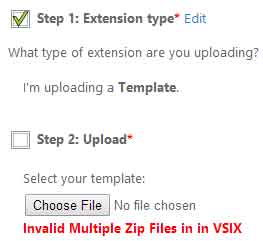
Add more than one project template to your Vsix and try and upload it - this is what you’ll see:
It’s a pain to solve this problem - basically you need to change the folder structure within the vsix file, then change the xml that describes it. Now this is not too much of a problem if you do it once or twice, but if you’re in the situation where you want to be able to build a release of your code rapidly, including extensions, this will seriously slow you down.
Enter VsixTools, a little Powershell script that lets you resolve this issue and as a bonus lets you set the version in the Vsix as well - very useful for scripts that build releases. You can use it like this:
# Load vsix tools
. VsixTools.ps1
# Set the version number of 'MyPackage' and fix the zip issue for uploading to the gallery.
$vsixPath = "c:/MyPackage.vsix"
Vsix-SetVersion -VsixPath $vsixPath -Version "2.2.0.1"
Vsix-FixInvalidMultipleFiles -VsixPath $vsixPath</pre>
This Powershell script has no dependencies, it’s just Powershell 2.0. Get the script at github.com/dwmkerr/vsix-tools.
It works for package manifests of version 1 or 2 - for anyone who’s lucky enough to have not had to delve into the internals of this that means that it works from Visual Studio 2010 onwards.
